Monday, December 29, 2014

Vegan Lasagna Rolls

New stove! - heatherq.com


We got a new stove! It’s been a long time coming. We went over to our local appliance store and picked up a Whirlpool range. We’re very pleased. But before it went away, we celebrated the old range's last day on earth. We made one of our favorites. Lasagna Rolls! There’s something about lasagna in roll form that makes it even better.

We always make too much for 2 people so that we can enjoy the leftovers for a few days. This recipe keeps and reheats extremely well.

Vegan Lasagna Rolls - heatherq.com

Witness, the great rolling of the rolls.

Vegan Lasagna Rolls - heatherq.com
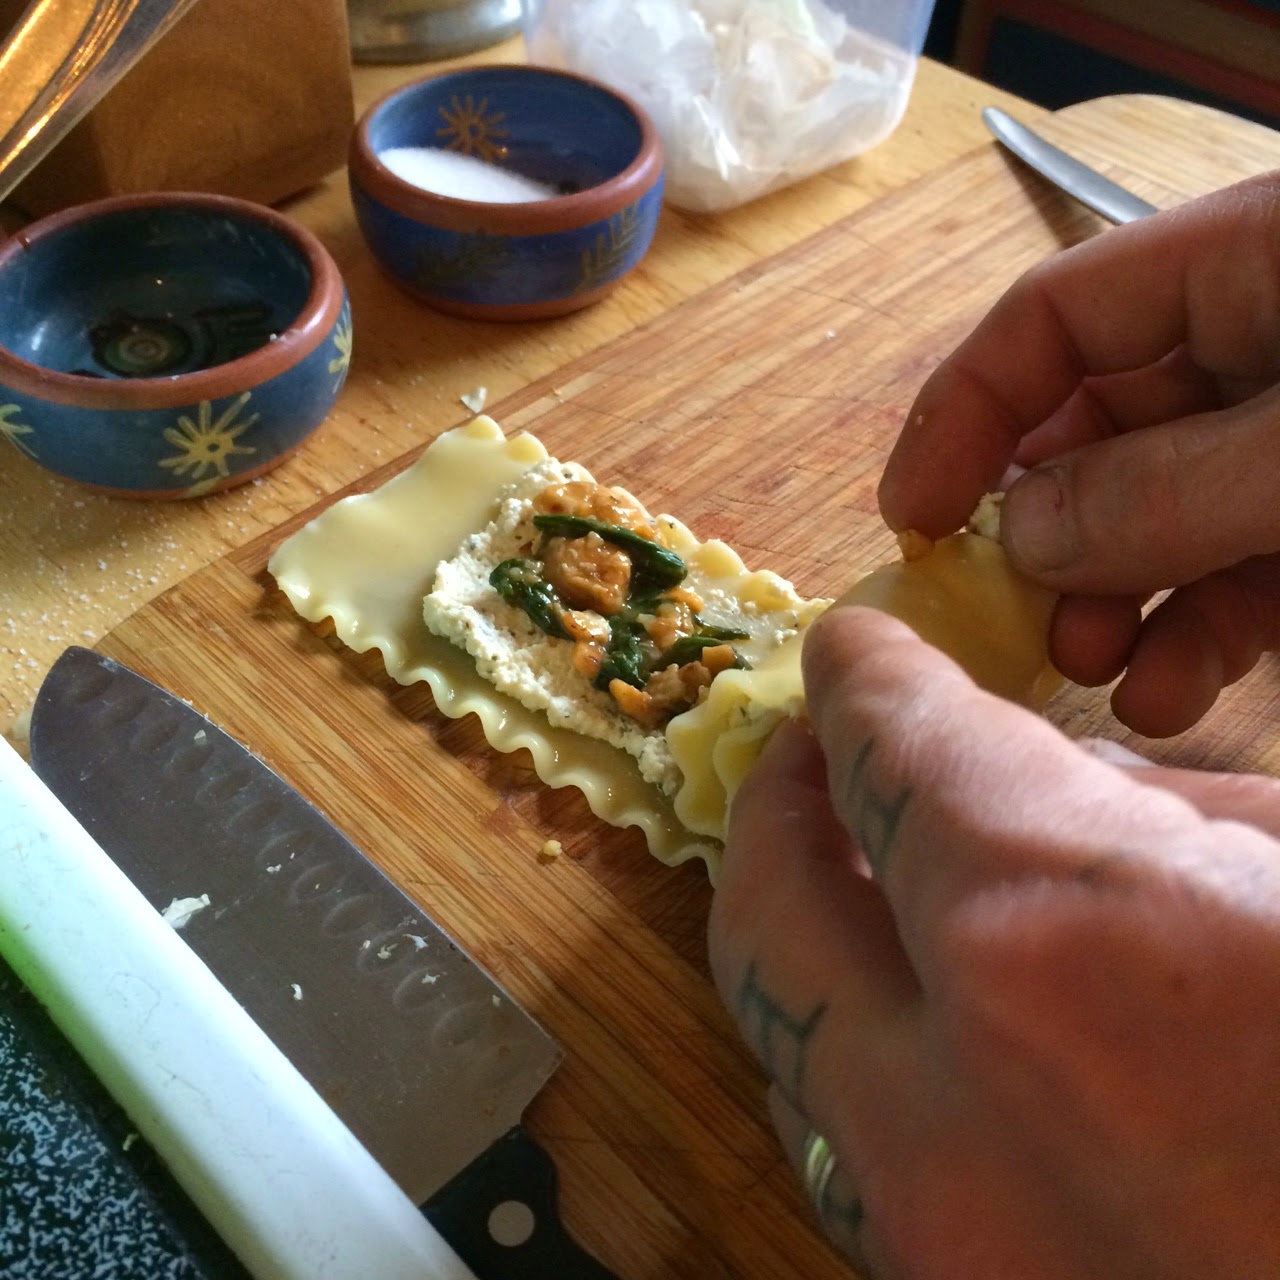
Layout the lasagna roll and top first with cheese, then tempe/spinach filling

Vegan Lasagna Rolls - heatherq.com
Roll 'em up

Vegan Lasagna Rolls - heatherq.com
Place end up in a pan

Vegan Lasagna Rolls - heatherq.com
Top with sauce and vegan cheese

Vegan Lasagna Rolls - heatherq.com
Bake for 25 mins and make dog super jealous

Vegan Lasagna Rolls - heatherq.com
Serve

Vegan Lasagna Rolls:

Ingredients:
15 lasagna noodles, cooked
2 cups Red sauce of choice
Diaya mozzarella shreads (or other vegan cheese)
Tofu Ricotta Cheese
          Block of Tofu
          1 tsp dried basil
          1 Tbl Nutritional yeast
          1 Tbl Olive Oil
          2 tsp apple cider or white Vinegar
          1 tsp salt
          1 tsp powdered garlic
          1 tsp powdered onion
Filling
          2 Tbl olive oil
          1 medium onion, diced
          1 block tempe, crumbled
          2 Tbl Braggs liquid aminos
          1 tsp Garlic powder
          1 bunch spinach (washed and chopped)

Directions:
Boil the water, heavily salted, for the lasagna. While the water is heating up, work on the tofu ricotta. Put all of the “Tofu Ricotta Cheese” ingredients in a food processor and blend until smooth. Set aside.

Keep an eye on your lasagna noodles as not to overcook.

In a large skillet, heat oil and sauté onions until they begin to turn translucent. Add tempe, Braggs and garlic powder. Sauté for about 8 minutes. Add spinach handful by handful, covering for a bit, then stirring it in as it starts to wilt. Remove from heat.

Pre-heat oven to 385 degrees and start to roll the lasagna! Now it’s assembly time! Put a layer of red sauce in the bottom of a 8x10” pan. Lay out a lasagna noodle on a cutting board and put a thin coat of Tofu Ricotta on it. Spread a couple spoonfuls of topping on top of the ricotta. Roll up the lasagna noodle. Place standing up in pan. Repeat until all noodles are rolled.

When all the rolls are rolled up, cover tops with a sprinkle of cheese, then a layer of red sauce and another sprinkle of cheese.


Bake for 25 minutes. Then broil for 4 minutes to crisp slightly.

Makes 15 rolls. Serves 2 people for several days... or 6-7 people for a lovely dinner party

Saturday, December 27, 2014

Vegan Volcano Biscuits

Vegan Volcano Biscuits - heatherq.com


These biscuits have a warm jam topping that melts down the side of the biscuit when cooked. The lava flow of jam is the hallmark of my volcano biscuits. And let’s be real, it’s fun to wake up and ask “Do you want volcanos?”

Dough:
2 cups flour
2 Tbl sugar
½ tsp salt
1 Tbl baking powder
1 Tbl ground flax seed (I just grind it up in a coffee grinder) – you can also sub 1 T dry egg replacer
1/3 cup light veggie oil
1/3 cup rice or soy (or whatever fake) milk
½ cup water
1 tsp apple cider vinegar (white vinegar also works)
6 Tbl of your fave jam
1 additional Tbl of sugar for dusting

Heat oven to 385 degrees.

In a medium mixing bowl, combine all the dry ingredients. In a small bowl, combine all of the wet ingredients. Make a well in the middle of the dry ingredients and pour in the wet, then fold wet and dry together.

Make 6 balls out of the dough and put them on the baking sheet. Press down on the dough balls, making them into a sort of nest shape – this usually involves flattening the dough out a bit, and then pushing down a little extra in the middle of each one. Top each with 1 T of jam. Dust dough with remaining Tbl of sugar. Bake for ~18-20 minutes.

Makes 6


Tuesday, December 23, 2014

Fig Puffs

I love figs. I love figs to a level that is a little frightening. We have a gorgeous fig tree in our back yard and I really like making these crispy, flakey, attractive Fig Puffs as soon as they start to ripen. They are so delightfully easy.  


Fig Puffs - heatherq.com

To make them, you need:
1 package frozen Puff Pastry
3 Tbl white or raw sugar (divided)
3 Tbl brown sugar
3 ripe (soft but not super soft) green or black figs - I use green

Directions:
Remove frozen puff pastry from the freezer about an hour before you start the rest of the recipe. 

Preheat oven to 400 degrees. Combine both sugars in a small bowl, keeping 1 Tbl of white/raw sugar set aside. Open the puff pastry and unfold it flat on a baking sheet. Cut the puff pastry in 6 equal parts (I usually follow the seams and then slice the long pieces in half). Sprinkle puff pastry with white/raw sugar 

Prepare figs by slicing off stem and bottom. Slice fig into 1/8th inch slices. Arrange in a row on the pieces of puff pastry. Sprinkle each piece with the sugar mixture. 

Fig Puffs - heatherq.com

Back until golden brown and delicious looking (about 15 minutes) - Remove from oven and enjoy!

Fig Puffs - heatherq.com


Sunday, December 21, 2014

Persimmons and Home Canning Basics

I have the pleasure of working with the Portland Fruit TreeProject throughout the year. They are a great organization, which organizes harvest parties for the large amount of fruit trees in Portland. Groups of volunteers harvest ripe fruit and a portion is donated to the Oregon Food Bank. Volunteers also take home a portion of the fruit, as does the owner of the property/fruit trees. On top of the harvest parties, they also organize canning and cooking classes to help people with ideas on what to do with… we’ll say 30+ pounds of Persimmons, for instance.

Persimmons!

Enter Heather and Jason! We joined with the PFTP to teach a Persimmon Preservation class. We did a demo of one of my favorite persimmon recipes, Persimmon Chutney. It makes a great addition to a holiday gift basket and goes well on all sort of things. Jason prefers it on pork while I prefer it on a nice curry… or a spoon.

To help with the class, I put together a handout. Who doesn’t like a good handout? It includes three persimmon recipes as well as a basic guide to home canning. Credit where it is due, the basic guide came directly from My Pantry Shelf. It is incredibly well written and a great guide.

The three recipes are:
Persimmon Chutney
Persimmon Jam
Persimmon Cookies

Granted, persimmon cookies aren’t a canning thing, but it you have persimmons, you should 100% make these cookies. They are soft and chewy. On top of that, the bizarre science experiment that is persimmon and baking soda brings me a weird level of joy.


Wednesday, July 16, 2014

Creamy Peach Mango Popsicles - Pinterest Battle, week 2

In celebration of the heatwave that Portland has been sitting in for the past week, I decided to break in my growing collection of popsicle molds! I've been eyeing a bunch of fancy recipes on Pinterest, along with all things summer. My creation is a delightfully cool and creamy (vegan) peach mango number.

Vegan Yogurt Peach Mango Popsicle - heatherq.com

Creamy Peach Mango Popsicles
Ingredients:
2 8oz containers of coconut milk yogurt - vanilla flavor (I used SoDelicious brand. I heart it)
1 bottle of R.W. Knudsen Mango Peach juice

Directions:
Put about 2 spoonfuls of yogurt into each popsicle mold. Hold at angle and lightly bang it on counter, so that it all goes to one side. Place in freezer for about 2 hours. Remove from freezer and fill the remaining space with juice. Put sticks/tops on popsicle mold and pop back in freezer for 4 hours or more. Enjoy!

Makes 8 popsicles


Vegan Yogurt Peach Mango Popsicle - heatherq.com
This is enjoyment.


Monday, July 14, 2014

Wednesday, July 9, 2014

The long road to nowhere

While I was making my concrete crafts, based on my Pinterest pins, I discovered that one of them went to a website in ... a language I don't speak. Which was fine. I do my best worked based on pictures only. What makes me extra sad are the Pins that go nowhere, which happened today with a pretty ring that I need and will find.

Since I deal with negative emotions in a way that you might be familiar with by now... I made this:

Pinterest link to nowhere


Tuesday, July 8, 2014

Concrete Candle Holder


I thought I’d start the Pinterest Battle off with a personal challenge. I rarely do poured mold items. I love sculpture, but rarely actually do them. I wanted to get over some of my fear and develop a new skill a bit. Concrete seems pretty approachable, after all.

I was directly (P)inspired by these concrete candle sticks. Once I practice a little more, I aim to add textures, like this leaf imprint. I absolutely want to get to where I can confidently make some weird shapes. This is absolutely a craft where practice makes perfect.

I got some Quikrete. I chose the brand mostly just because it came in an easy to carry little bucket. They make all sorts of types from patch, to spackle, to quick-set concrete. Make sure you actually get concrete as spackle is crumbly.

Quikrete

Something you need to know about me, I love math problems. I thought I was being all smart, basing the amount of mass (concrete) I would need by filling the mold with water and measuring the water. I then based my concrete to water mix on that. My particular concrete mix was 5.5 concrete:1 water. My first attempt (Edit: pictured at the end) required 2 cups of concrete (mixed). So, I went to the board – this is how my mind works:

Concrete conversion

Lesson Learned: 2 cups of dry concrete powder, mixed with water – reduces in mass by about half. So, if you need 2 cups of mixed concrete, start with about 4 cups of dry concrete powder. ALSO – when pouring a mold like this you will want to add about 30-40% more liquid to the mix. It will take longer to set, but you’ll actually be able to pour it and work with it.

(Lesson I’m not learning right now: I’m not sure if I should be saying Mass or Volume. I’m going with Mass. It feels right.)

Once I mixed up the concrete, I poured it into a Tupperware bin that was sprayed with regular cooking oil. I then pressed some tea lights into it, as well as some glass votive candles. These were also sprayed with cooking oil first, to ensure they didn’t fuse with the concrete. To dress it up a bit, I pressed glass into the concrete (not sprayed).

Make your own concrete candle holder

After a couple of hours, when the concrete did not move when poked, I removed the glass votives and tea lights to allow for even drying.

Make your own concrete candle holder


The concrete will take a couple more days to fully cure, but I removed it from the mold this morning to get the final shot. It had been in the mold for about 48 hours. It holds together and I give it an A for effort. It’s not really my style, but it was a great first (technically second) try. I will be playing with concrete again. I MADE STONE!

Make your own concrete candle holder

Edit: So, we took the first concrete attempt out of the mold last night. I had thought that I made the walls way too thin and it would crumble. As it turns out, I didn't and I love this one! It was made with a quart sized soup takeout container and a large plastic cup. I covered the plastic cup with saran wrap, which I don't recommend at all since it fused into the concrete. Other than that, it's super neat looking. 

Make your own concrete planter
All Hail, Attempt No. 1!


Thursday, July 3, 2014

Pinterest Battle! Heather vs Heather

Pinterest Battle - Heather vs Heather

You know how you have that Make this! DIY craft board on your Pinterest? The one that you never actually do any of the projects from? Yeah, I have that too.

I've been inspired by my friend Heather's rad projects that she's been working on and posting on her blog, The Feaths Can Do It. She's an amazing lady and I love dorking out about projects with her. Since inspiration sometimes takes a weird turn, a Pinterest Battle was born.

The Rules of Pinterest Battle are pretty vague and forgiving.
    1. Make something (Food or Craft) from one of your Pinterest boards - or something (p)inspired by one of your pins.
    2. Document it
    3. Blog about it.
    Post one per week.

I'm not even certain how one wins a Pinterest Battle, but we're going to have an amazing time at it.

Result - Motivational kick in the pants.

This is going to get awesome.


Tuesday, July 1, 2014

Sometimes it is your circus

I have a compulsion to fix things. Anything. It's what keeps me going. However, I frequently remind myself that some things are not mine to fix. The phrase "Not my monkeys. Not my circus." is a calming little mantra. However, sometimes, those totally are my monkeys and that really is my circus... and when the crowd is getting restless and the clowns aren't in their makeup, I need a little calming moment to myself to become the Ring Master.

During today's little moment of reflection and breath, I made this.

My monkeys, my circus

And now, back to the show.

Friday, May 30, 2014

Excel - Combining text in multiple columns into one and Paste Value

Concatenate and Paste Value


It's a Excel Tech Tip kind of week!

I made this for one of my favorite humans. She uses these quite a bit, but sometimes the memory of them hides on her.

The first one, Concatenate, is delightful. There are a number of ways to do this task, so I listed our personal favorites. It's like mail merge for Excel! It will take the text in multiple cells and display them in a single cell. The two examples will display the same way.

=A1&" "&B1&" "&C1&""
or
=CONCATENATE(A1, B1, C1)

You can even get a little fancy and add punctuation or words in between each cell:

=A1&" & "&"B2 would display as Bob & Steve  (if A1=Bob and B2=Steve)

Similarly, you can use Concatenate:

=CONCATENATE(A1," & ",B2) would also show up at Bob & Steve

For the second part of the poster - Paste Value. There are a lot of "Paste special" options - I personally use Paste Value more often in what I'm working on. It is especially helpful if you want to paste the contents of a cell into another part of a spreadsheet, but want the hard coded number, not a link to the live data that might change tomorrow. Paste Value takes the formula away and just leaves you with the number, no frills, no database connections.

Please enjoy!

Wednesday, May 28, 2014

How to change #REF or #N/A to 0 (or whatever you want)

Change #REF or #N/A to 0


Ooohhh Excel tips. I love them.

I'm in the middle of making a report where data will be added weekly. Right now, I have no data (calls) for the 5pm timeslot, but there might be some in the future. So, for design sake, I'm making a place for 5pm and entering the formula that will work once there is data. Presently though, the formula returns #REF. Since that's just ugly, I want a way to change the #REF to display as zero. A quick search brought up this delightful formula:

=IF(ISERROR(yourformula),0,yourformula)

In my case, the full formula looks like this:

=IF(ISERROR(GETPIVOTDATA("Count",$S$12,"Time",17,"Day","Friday")/K7),0,(GETPIVOTDATA("Count",$S$12,"Time",17,"Day","Friday")/K7))

Currently, it displays as zero. Once there is data for Friday at 5pm, my formula will take that number and divide it by however many Fridays (K7) we have been tracking. Then give me an average of calls per hour, per Friday.

Sidenote - Since this is based off of a pivot table, you would think that you could just select "Average" in the values for this. However, due to what is included in the data, it is not dividing the total calls but the amount of actual Fridays but rather how many times "Friday" occurs. So, we take the long way around. If you are reading this and thinking "wow, why did she not try ___", please feel welcome to comment your suggestion. I often take the long way around when it's actually quite straight forward. This is my source data, which is then converted into a pivot table and grouped by hour, day, date, user (whatever is needed, you know how it is)

Sales calls in Excel


Thursday, May 22, 2014

The garden grows

We got half of the garden planted last month and there is more to come this weekend. It looks like we're in for a great growing year!

The new potato bin is amazing. It's made out if a drawer insert that we found at the Rebuilding Center. Jason (the amazing husband) put casters on it, so it can be wheeled around the yard. Potatoes enjoy new views and travel, just like the rest of us. 

Potato bin

We have also planted beets, chard, romaine, strawberries, kholrabi and carrots. The carrots aren't sprouting for some reason... Very likely because Data Dog keeps jumping into the containers. I'll plant more in the planter bed this weekend. 


Next up is tomatillos, tomatoes, hops, more beets (never enough). Pickling cucumbers will follow close behind. 

I'm looking forward to a bounty this year!

Tuesday, April 8, 2014

Seitan Roast – Celebrate your Holidays with Seitan

Seitan Roast – Celebrate your Holidays with Seitan

I love this roast for holiday events. With Easter coming up, I wanted to share it with you. This is a great one for mixed company. Meat eaters completely enjoy it. Sadly, not for the Gluten Free guests though.

All Hail Seitan!

Seitan roast - vegan


Ingredients
For the Seitan:
10 oz Firm tofu
1 cup water
3 Tbl oil
2 tsp salt
1 tsp pepper
2 tsp onion powder
1 tsp garlic gradual/powder
1 tsp sage
2 Tbl soy sauce
1 Tbl Braggs liquid amino (or ½ Tbl more soy sauce)
2 Tbl Nutritional yeast (big flake, not fine powder)
2 tsp Kitchen Bouquet
2 and 1/4 cup vital wheat gluten

For the Stuffing:
.5 cup mixed wild rice
1 cups water
1 “chicken” flavor bouillon cube
1 sprig fresh Rosemary, finely chopped
¼ cup pine nuts (raw or toasted – I usually use raw)
Salt and pepper to taste

You will also need:
A steamer tray or stove top steamer (available for super cheap at any Asian grocery store)
Tin foil
Spray cooking oil

Start the stuffing first – In a pan or rice cooker, add rice, water, bouillon cube and rosemary – Cook rice following standard cooking method – Once rice is done, add pine nuts, salt and pepper to taste. Set aside.

Get your steamer going.

In a medium bowl, add the vital wheat gluten. In a blender (blender is preferable, but food processor will also work), combine everything on the “For the Seitan” list except the vital wheat gluten.  Pour mixture into the bowl with the vital wheat gluten and stir. Once the mixture has combined a little, get your hands in there and knead it a bunch. You want to activate the gluten so that it pulls against itself a bit and creates thick strands (about 3-4 minutes of kneading).

Lay out 2 large pieces of tinfoil in a cross pattern and spray with cooking oil.

Create a flat layer of the gluten mixture in the center of the tinfoil cross. To do this, I usually pull off small pieces and lay them side-by-side and then flatten them all together (since gluten can be difficult to roll out or flatten like pizza dough) – the small pieces will form together as it is cooking.

In the center of your flattened gluten, make a pile of the rice mixture. Roll the gluten around the rice mixture like a burrito. Pinch the ends together so that the rice is entirely encased. Use the foil wrapping to hold it all together tightly.

Place in the steamer and steam for 1 hour. Check on the water occasionally to make sure your steamer doesn't boil dry. 15 minutes before the steaming is complete, turn the oven to 350 degrees. When the steaming is complete, put the foil wrapped goodness into the oven for 45 minutes.

Optional, you can roast vegetables in the oven with the roast (in a separate pan) so they are ready when the roast is!

When oven time is complete, serve sliced with your festive meal :D

Vegan holiday meal


Friday, March 28, 2014

Beet Burgers - Gluten Free and Vegan


Beet burger - vegan


I don’t think I can eat enough beets and cauliflower. They might be my favorite foods. Both vegetables are incredibly versatile.

For this meal, I went very “American bar food” – burgers and hot wing. Shockingly, we were not watching sports that night.

For the hot-wings, I love the PETA Vegan Spicy Buffalo Cauliflower Wing – I have made them with a few different types of flour and find that brown rice flour is my favorite – this makes them vegan AND gluten free AND paleo (in some people’s interpretation of paleo). While I am not gluten free nor paleo, I have some dear friends who are both. Finding gluten-free, paleo, vegan recipes is an exciting challenge. I love food challenge.

Beet burger and cauliflower hot wings - vegan


The Beet Burgers are hands down my favorite burger ever. The recipe is super quick and easy too!
Note: if you go gluten free on the flour and bun, this is a great gluten free and vegan meal!

Ingredients:
3 whole beets – medium sized:  raw, peeled and grated
1 small onion, diced
2 Tbl chia seeds
1 Tbl flour (whatever kind you like, I love brown rice flour)
1 Tbl olive oil
1 tsp garlic granuals/powder
1 tsp onion powder
2 tsp dry basil (if you have fresh, use that instead. Nummers)
Salt and Pepper to taste
Oil for frying
Condiments and Buns – I love sprouts, avocado and vegan mayo/aoili on this amazing burger.  

Instructions:
Combine all ingredients in a medium bowl, stir well. Let sit for about 30 minutes.

Once the beet mixture has had time to mingle, heat about 3 Tbls of oil In a pan. Form the beet mixture into patties and place carefully in the oil. Let cook on that side for 4-5 minutes, until a good crust has formed. Flip and cook that side as well.

Place pattie on bun and add condiments.

Enjoy!

Serves 2-3, depending on burger thickness.


With the leftover beet mixture, I made little slider burgers and fried them. I then packed them for lunch the next day with some adorable vegan (but not GF) buns that I found. This is the slider bar at my desk at work:
Beet burger sliders - vegan

Excel Formula Tips

In a world where art meets Excel, lives these pretty little Excel Tips posters.

I had gathered some formulas for calculating workdays and displaying weekdays and workdays in a report. I use them often and wanted a nice way to remind myself of them.

This one hangs at my desk:

Excel tech tip poster

This is one that I made for a coworker who wanted a refresher on Excel, basic Sum and Average functions, as well a keyboard shortcuts for copying formulas and cells across rows or down columns. I added the fill series down menu option, since it is used often in our office. The background of this one is Opal Creek, OR. So pretty. I look forward to going there this summer.

Excel tech tip poster